|
|
|
Designed
By Malc Jennings 1999-2000
|
|
HOW TO
Make A Bootable ADF
|
| Introduction To Tutorial |
|
This tutorial will show you how to make yourself a blank formatted ADF image and how to make this ADF bootable. This guide is very straight forward and is useful to those who wish to create there own collections of utils or a boot disk for WinUAE. I hope this guide proves useful and you find it easy to follow. |
| Requirements |
|
You will need the following to follow this tutorial:
Once you have all of the above proceed to the guide. |
| Guide |
|
Start WinUAE and insert your Workbench ADFs, click OK and once Workbench has loaded click the Press F12:
Now, although you have just created an ADF image it has not been formatted and is therfore not much use as far as saving games goes or using it for any kind of data storage, so what we need to do now is format the disk so:
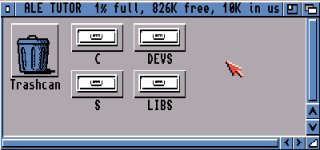
You will notice another icon on your Workbench desktop, it should look something like:
Indicating that the disk is in drive DF0: and is currently unreadable by Workbench, so now it's time to format the ADF. Click the icon once with your left mouse button, now hold your right mouse button and select Format Disk from the Icons pull down menu at the top of the screen: See the illustration below.
The format program should appear once you have clicked "Format Disk".
You do not need to enable any of the other options. Please note that Quick Format is only available to disks/ADFs that have been formatted once before, as this is a new disk the Amiga file system needs to be written in order for it to work. See the illustration below.
Once this screen reaches 100% you have yourself an empty, formatted ADF. Now, time to make this ADF boot! - in this case we will just get the disk to load Workbench but the possibilities are endless. Okay, now we are back in the Workbench screen, open the newly created blank disk (double click) and:
Your disk should now look something like this:
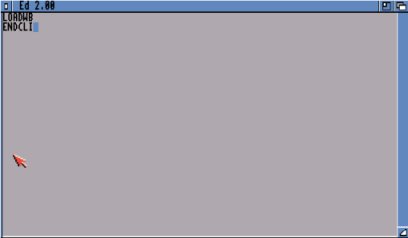
Again, back to your Workbench disk - double click the SYSTEM folder and then either Shell or CLI to open the AmigaShell window:
In this window type:
These are the only files we need from the Workbench disk (at least to create this disk, you will find that you need to copy some of the libraries from the Workbench disks to your new disk to get some programs to work). If you have the original Workbench disks you can type the following in the AmigaShell, if not you will need to jump to the Notepad section.
Now type the following in the ED window, followed by ESC and S to save the file to disk.
Notepad If you don't have the original Workbench disks there is a possibility that you don't have the ED program either, so you will need to ALT-TAB back to Windows, load Notepad and type the above into a new document. Once finished, save the file to your C: drive and call it startup-sequence. Make sure the .txt extension isn't applied to the end of the file, to do this select All Files before saving. Once you are back in WinUAE type the following into AmigaShell:
Finally Which ever way you created the startup-sequence you can reset now test your ADF.
Now to reboot and test this baby out, press both of the ALT keys followed by CTRL to reboot the emulated Amiga. Your ADF should now present you with the Workbench screen. So how did we do it? The startup-sequence is basicly a set of instructions for the Amiga to follow when you reboot with the disk in the drive, rather like the Autoexec.bat file found on your PC. These instructions are mainly just program names, for example LOADWB is a program stored in the C drive of your bootable ADF, if you have a game stored in the root directory of this disk - for the sake of argument lets say it was called ALE you could make a startup-sequence to load this program, it would look like: ALE You would then save this file and reboot the machine, with any luck the program should run during startup. If the program fails to run you will certainly find that it is due to a missing file, the most common missing file type is a library (LIBS). To solve this problem copy the following libraries into the LIBS folder: ASL.LIBRARY Try again and it should work - see our trouble shooting guide for more info. |
| File Not Found? - Contact the webmaster for an excuse and maybe a fix. |
|
Web
site designed by Malc Jennings © 2000. All software copyright to
the prospective owner.
|