|
AmigaGuides are nothing more than normal text files. However, they do
store different styles by means of a set of codes denoted by letters.
This means that if you load an AmigaGuide into a normal word processor
you will not only see text but also a set of rather strange characters
surrounding certain parts.
What happens is that a special program known as AmigaGuide will decode
these characters when viewing and make them look and do extra special
things. All that you need to do is create a document in any text editor
and save it, then add an icon and ensure that it's default tool is either
AmigaGuide.
The following is a guide to the most popular codes using in AmigaGuides.
This is a short listing for an AmigaGuide document followed by an explanation
of the codes - Note: for your reference only the lines have been
numbered - these line numbers should not be included in your AmigaGuide
document.
- @database ALE Tutorial
- @wordwrap
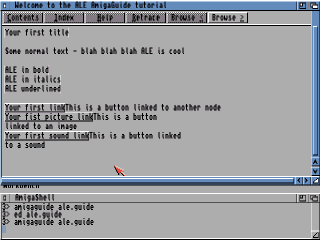
- @node Main "Welcome to the ALE AmigaGuide tutorial"
- @{fg shine}Your first title@{fg text}
- Some normal text - blah blah blah - ALE is cool.
- @{b}ALE in bold@{ub}
- @{i}ALE in italics@{ui}
- @{u}ALE underlined{uu}
- @{"Your first link" link link1}This is a button linked to
another node
- @{"Your first picture link" link yourdisk:pictures/ale-logo.gif/main}This
is a button linked to an image
- @{"Your first sound link" link yourdisk:sound/wassup.iff}This
is a button likned to a sound
- @endnode
- @node link1 "The linked node!"
Note: The image above does not fully show the features outlined
above as the AmigaGuide software is/was incorrectly installed.
- The first line of the document needs to inform your Amiga what type
of document it is. "@database" tells the Amiga software that
this is an AmigaGuide. "ALE Tutorial" is simply the title
of the document; you can call it whatever you want.
- "@wordwrap" turns the automatic sizing on. This means that
you can type lines as long as you wish without any returns and the AmigaGuide
will make them fit the window or screen size.
- The first page of the document needs to be named. Each page is called
a node, so the first page is named using "@node Main". The
text in quotation marks will appear on the title bar of your AmigaGuide
(see screen shot above)
- The first line of your document can be made to stand out, like a title.
"@{fg shine}" makes the text a different colour - white by
default. Any text you insert after this will appear in white unless
you switch back to the normal text colour, to do this simply insert
"@{fg text}".
- Just typing in text will appear as it would in any normal document.
- Text can be shown in bold with the AmigaGuide format using the "@{b}"
command and as in step 4 it will need to be turned off again so that
the rest of the text is reset to normal using "@{ub}" command
at the end of your text.
- This is the same as step 6 only in italics
- Again the same as step 6 but underlined. You can also combine the
commands for bold, italic, underlined and title - for example "@{b}{i}{u}{fg
shine}ALE Rocks@{ub}{ui}{u}{fg text}" would put the words "ALE
Rocks" in bold, white, italic and underlined format.
- This is where the AmigaGuide format shines, these commands allow you
to quickly create a button linked to another file or page in your AmigaGuide.
The text in quotation marks is the writing that will appear on the button
itself, in this case "Your first link". The word "link"
tells the guide what the button will be linked to. The word "link1"
is name we have given to the node (page) that is should go to once the
button is pressed. After the closing commands, identified by the closing
squiggly bracket "}" you can place some text that will tell
your readers what the button does. This way you can incorporate buttons
into your text. You could type "Amiga Legal Emulation, hosted by
@{"EmuHQ" link EmuHQ}" and have a link to the node EmuHQ
were there would be more information on Emulation HQ.
- AmigaGuides are capable of dealing with more than just text. This
link displays a picture/image ale-logo.gif from a disk called yourdisk:.
The "/main" is needed for it to open up what is essentially
another document to display the picture.
- You can link to any supported datatype, so not just pictures, which
you could have an IFF, JPEG, TIFF, GIF, BMP etc. You can also link to
sounds which wil be played when the user clicks on the button.
- In order for nodes (pages) to make sense, the program needs to know
when a node (page) ends. So, every time you want a page to end you must
insert "@endnode".
- Any nodes (pages) need to be noted. This is the node referred to in
step 9. As with the main node (step 3) the text in quotation marks appear
in the title bar.
Setting Up The Icon
Once you have written your AmigaGuide you are ready for viewing and testing.
If you have used a good word processing package then you should have an
icon already created for you - here is how to get AmigaGuide to view the
document when you double click.
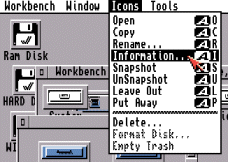
- Select your icon using the left mouse button (see below)
- Press and hold your right mouse button to reveal the menu at the top
of your Workbench screen, move your pointer up to the Icons menu and
select Information (see below)
- Another window should pop-up displaying information about your AmigaGuide,
for the purpose of this tutorial we are only going to concentrate on
the Default Tool: text box. Enter the name and location of your AmigaGuide
viewer in this box, in most cases it should simply be c:amigaguide
(see below)
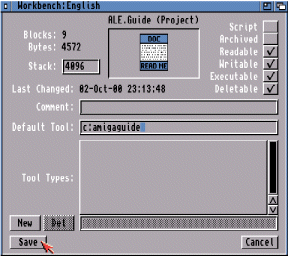
- All that remains is to hit the Save button, the window will now close
and your icon will be updated. Test it out by double clicking it from
Workbench.
IF you do not have a good text editor then you will not have an icon
for your AmigaGuide - don't worry though there are two ways around this
problem.
"Borrow" an icon
- Locate another document on your hard disk that does have an icon and
has the Default Tool: above available in the information section. For
this example the document we wish to borrow the icon from is called
"ALE.DOC"
- Now open an AmigaDOS/Shell/CLI window by double clicking on the CLI
tool in the System folder of your Workbench disk, the following window
should pop-up.

- Now the icon we wish to borrow (ALE.DOC) and our AmigaGuide (ALE.Guide)
are stored on our workbench disk so we type
SYS:
COPY ALE.DOC.INFO ALE.GUIDE.INFO
- This will copy the icon (known as the info file) from the ALE.DOC
file to a new icon for ALE.GUIDE (see below)

Before we did the above

After we did the above
- Just remember that the icons in the Workbench environment always end
with .info and even though we have already used a full stop at
the end of our file name, in the Amiga environment you can have as many
as you need. Now follow the Setting Up The Icon steps above.
No Icon At All
- You do not need to have an Icon to be able to view your document as
an AmigaGuide.
- Open an AmigaDOS/Shell/CLI window by double clicking on the CLI tool
in the System folder of your Workbench disk, the following window should
pop-up.
- Now type the name of your AmigaGuide viewer followed by the name and
location of were you saved your guide. In most cases your viewer is
simply Amigaguide - we saved our guide to the Workbench folder so we
would type:
amigaguide sys:ale.guide
- Your guide should now be displayed (see below)
That should be enough to get you started, we will look at more advanced
features in AmigaGuides in a later tutorial, have fun.
|