|
|
|
Designed
By Malc Jennings 1999-2000
|
|
HOW TO
Install Workbench On A HDF
|
| Introduction To Tutorial |
|
Assuming you have previously created either the HDF (hard drive file) created earlier in the tutorials or you have already created a HDF file before this tutorital will show you how to install Workbench (both native and retail) onto your newly created HDF. Once we have finished this you will be able to boot from your HDF file instead of using those floppy disks. |
| Requirements |
|
You will need the following to follow this tutorial:
Once you have all of the above proceed to the guide. |
| Guide Retail |
|
Let's start by looking at the retail edition of Workbench - the one you get with your Amiga, which you probably downloaded from the internet. Follow these steps:
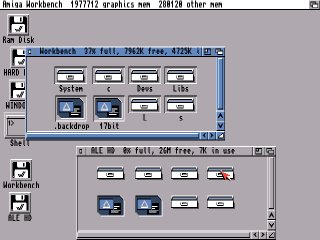
This is really simple, all you need to do is drag and drop all of the files from your Workbench ADF to the Hard drive, to do this:
See the illustration below:
This is enough for most systems although you are better finding a copy of updated libraries as the ones that came with Workbench have since been updated, check Aminet for updates. These should be placed in your Libs folder. |
| Guide Native |
|
This one is especially for those of you that don't have the original Workbench disks and can't find them anywere. The Native version of Workbench has many valuable files missing such as important run-time libraries and system files so you may run into problems later but - hey it's worth a shot right?.
Now, the startup-sequence on the boot disk is obviously not designed for Workbench use only so we are going to make a new startup-sequence. You don't have access to the Workbench text editor so we will need to ALT-TAB back into Windows and open Notepad to make our startup sequence for the new HD. Type the following in Notepad - exclude the bullets:
To save the file click Save As from the file menu and select All Files and enter startup-sequence as your file name, do not include an extension. Now ALT-TAB back into WinUAE and in that AmigaShell we mentioned earlier, type:
Note: DH1: is the name of your PC hard drive. If all goes well you can reboot the emulated Amiga by holding left and right ALT keys followed by CTRL. Remember to remove the ADF images from the floppies tab, press F12 and EJECT on all of the disk drives. Your emulated hard drive should boot and load Workbench. |
| File Not Found? - Contact the webmaster for an excuse and maybe a fix. |
|
Web
site designed by Malc Jennings © 2000. All software copyright to
the prospective owner.
|