|
|
|
Designed
By Malc Jennings 1999-2000
|
|
HOW TO
Make A Virtual Hard Drive (HDF)
|
| Introduction To Tutorial |
|
This tutorial will show you how to make yourself a nice 27MB hard drive to store all those Amiga games and of course the Workbench operating system on. This HD will be self booting so once you have finished creating the hard drive it may be worth checking out our "How to install Workbench on a HDF" tutorial. |
| Requirements |
|
You will need the following to follow this tutorial:
Once you have all of the above proceed to the guide. |
| Guide |
|
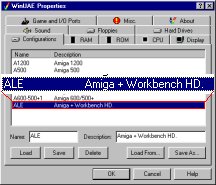
First we are going to load WinUAE and make a new configuration so that we can easily select the HD the next time around, so follow these steps:
Your screen should look similar to this:
Now click the RAM tab:
Your screen should look similar to this:
Now click the ROM tab:
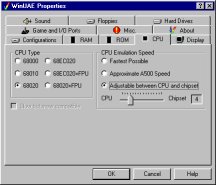
Almost there, now click the CPU tab:
Your screen should look similar to this:
Click the Display tab:
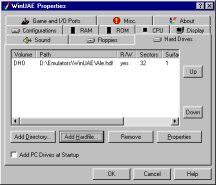
If you wanted to emulate an A1200 with HD you would click the AGA chipset but as we want a fast emulated system the ECS Denise is probably the best for the task, now select the Hard Drives tab:
And bingo you should now see the following on your Hard Drives Tab:
Now make sure you check the "Add PC Drives at Startup" option if you want access to your PC drives and CD-ROM through Workbench & AmigaDOS. Finally:
Okay, now you have created your Hard Drive once again it has not been formated, so insert your Workbench ADFs via the Floppies tab and click OK to start the emulation. Once you are in Workbench, simply left click the newly created hard drive and hold your right mouse button to select "Format Disk" from the Icons menu at the top of the Workbench screen. The HD is currently empty and cannot boot on it's own because Workbench is not installed, however this can soon be sorted by following our How To Install Workbench On A HDF tutorial. |
| File Not Found? - Contact the webmaster for an excuse and maybe a fix. |
|
Web
site designed by Malc Jennings © 2000. All software copyright to
the prospective owner.
|